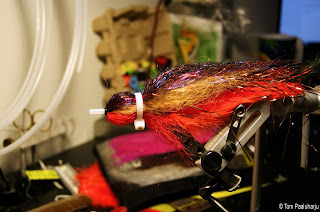
Its been a while since my last post and as it is, fall is approaching fast, and so is the prime time for pike fishing. So I thought to write about my favorite Pike fly.
So what makes a good pike fly? I think that there are a few things to think of when you tie a pike fly. The number 1 thing is of course, that it must catch fish preferably in a wide variety of situations. This means that it has to be big enough, have a good silhouette and if possible create some "noise" bellow the surface. The second thing to think about is that you should be able to cast the fly effortless for the whole day, this means that the fly must be both light enough for the fly line to turn over and at the same time heavy enough not to overcome its own drag in the air. Last but not least I think about the ease of tying and durability of the fly, because as most of you know the Pike has an impressive set of teeth and tend to treat flies quite harshly.
So with this in mind I have in the course of a couple of years developed a baitfish-pattern that is working quite well for me. The pattern works decently year around in the areas where I fish, is easy enough to cast with a 8 weight rod, endures a lot of fish (mostly over 30 fish) before becoming unusable and is easy enough to tie (takes about 15 min to tie). It is a crossbreed of some of the best known Pike flies in Finland, the Hollow Deceiver and the Slinky Tube(both articles in finnish). This is why I´ve decided to call it Slinky Deceiver. The reason I use Slinky fibre and other H2O products (such as Mirror Image and Deadly Dazzle) is that they are readily available in shops in my region, but any other long enough synthetic material ought to work as well
Recipe: Slinky Deceiver
Tube: 2/4 mm vinyl tube + 4mm silicon tubeThread: Kevlar
Tail: 3 Pairs of Schlappen+Slinky fibre+Flash(optional)
Body: Slinky fibre/Deadly Dazzle+flash(optional)
Throat: Slinky fibre/Deadly Dazzle
Wing: Slinky fibre
Head: Hot-glue
Eyes: 3D-Eyes
Tying the Slinky Deceiver:
Combine the tube and the hook holder with superglue
Add some lead
Tie in the Schlappen
Tie some Slinky Fibre on top of the Schlappen about in the middle of the fibers and secure with superglue
Double the fibers back on top of themselves
Add and double the flash (Secure with superglue)
Halve the next batch of fibres as shown bellow
Tie in the halved fibres so that about 3 cm(1 inch) of the batch is pointing back (Remember the superglue)
Double the batch back
Add another batch in the same manner (Optional:Tie flash on top of the first batch)
Halve and tie in the throat (About half back and half front)(Remember glue)
Tie in the top wing (do not halve)(Remember glue)
Double both top wing and throat back and finish the thread
Use a cable tie to keep the fibers in wanted position while you make the head
Add some hot-glue and attach the eyes
Cut off the excess tube and make the final form to the head by heating the glue with a lighter and forming it with MOIST fingers (otherwise the glue will stick on your fingers and in worst case cause burns)
Color the head after it has cooled down with some markers
and the fly is ready for action
The color above is called Jeppan
(my adaptation of a like named Buster Jerk color)
(my adaptation of a like named Buster Jerk color)
So this is how to tie my favorite pike fly, in future articles i might return to this pattern to give away some other color combinations that I have had success with


